


According to official remix documentation,
Remix is a full-stack web framework that lets you focus on the user interface and work through web standards to deliver a fast, slick, and resilient user experience. People are going to love using your stuff.
Remix.js emerges as a robust framework offering a fresh perspective on web development, emphasizing server-rendered React applications with an intuitive approach to routing, data management, and performance optimization. In this article, we'll explore Action and Loader in remix by building a simple todo application, which makes it more exciting and powerful.
Let’s start with a fresh Remix project. Create a remix project running the given command:
npx create-remix@latest --template remix-run/remix/templates/vite
This is how it’s root.tsx file actually looks like:
import {
  Links,
  Meta,
  Outlet,
  Scripts,
  ScrollRestoration,
} from "@remix-run/react";
import tailwindStyles from "./tailwind.css";
import { LinksFunction } from "@remix-run/node";

export const links: LinksFunction = () => {
  return [{ rel: "stylesheet", href: tailwindStyles }];
};
export function Layout({ children }: { children: React.ReactNode }) {
  return (
    <html lang="en">
      <head>
        <meta charSet="utf-8" />
        <meta name="viewport" content="width=device-width, initial-scale=1" />
        <Meta />
        <Links />
      </head>
      <body>
        {children}
        <ScrollRestoration />
        <Scripts />
      </body>
    </html>
  );
}

export default function App() {
  return <Outlet />;
}
Note: I have configured tailwind in this project, you should not worry about this in this tutorial.
You can see index page under /app/routes folder as _index.tsx.
import type { MetaFunction } from "@remix-run/node";

export const meta: MetaFunction = () => {
  return [
    { title: "Todo Application" },
    {
      name: "description",
      content: "Let's build awesome todo application in remix!",
    },
  ];
};

export default function Index() {
  return (
    <div style={{ fontFamily: "system-ui, sans-serif", lineHeight: "1.8" }}>
      <h1 className="text-center">TODO</h1>
    </div>
  );
}
Now, let’s dive into the topic.
Loader
Loaders in Remix.js serve as the foundation for fetching data on the server side before rendering a page. Unlike traditional client-side data fetching methods, Loaders execute only on the server during the routing phase, ensuring that data is available when rendering components. It supports asynchronous operations and provides a clear separation of concerns between data fetching and presentation logic. It is called whenever a page loads or some mutations occur. Let’s add a loader in our _index.tsx file.
export async function loader() {
  try {
    const response = await axios.get(
      "<https://jsonplaceholder.typicode.com/todos>"
    );
    const data: todoType[] = response?.data;
    return data?.slice(0, 10);
  } catch (err) {
    //there's better way of handling error
    // but for now let's focus on loader itself
    console.log(err);
  }
}

export default function Index() {
  return (
    <div style={{ fontFamily: "system-ui, sans-serif", lineHeight: "1.8" }}>
      <h1 className="text-center">TODO</h1>
    </div>
  );
}
I have declared a loader function outside the Index component. It simply returns an API response to the component. To use the result returned by the loader, Remix provides a special hook called useLoaderData. Let’s see it in action.
export default function Index() {
    // can even infer types from the return type of loader. Cool right? 😎
  const todoData = useLoaderData<typeof loader>();

  return (
    <div style={{ fontFamily: "system-ui, sans-serif", lineHeight: "1.8" }}>
      <h1 className="text-center my-4 font-bold text-4xl">TODO</h1>
      <div className="w-fit mx-auto">
        {todoData?.map((todo) => (
          <div
            key={todo.id}
            className="flex mb-2 items-center p-4 shadow-md rounded-md gap-8"
          >
            <p className="w-full text-grey-darkest">{todo?.title}</p>
            <div className="flex gap-4">
              {todo?.completed ? (
                <Icon
                  icon="lets-icons:done-ring-round"
                  width="24"
                  height="24"
                  style={{ color: "green" }}
                />
              ) : (
                <Icon
                  icon="material-symbols:pending-actions"
                  width="24"
                  height="24"
                  style={{ color: "orange" }}
                />
              )}
              <Icon
                icon="clarity:remove-solid"
                width="24"
                height="24"
                style={{ color: "red" }}
              />
            </div>
          </div>
        ))}
      </div>
    </div>
  );
}
The loader provides data to the HTML document on the initial server render. On navigations in the browser, Remix will call the loader function via fetch from the browser.
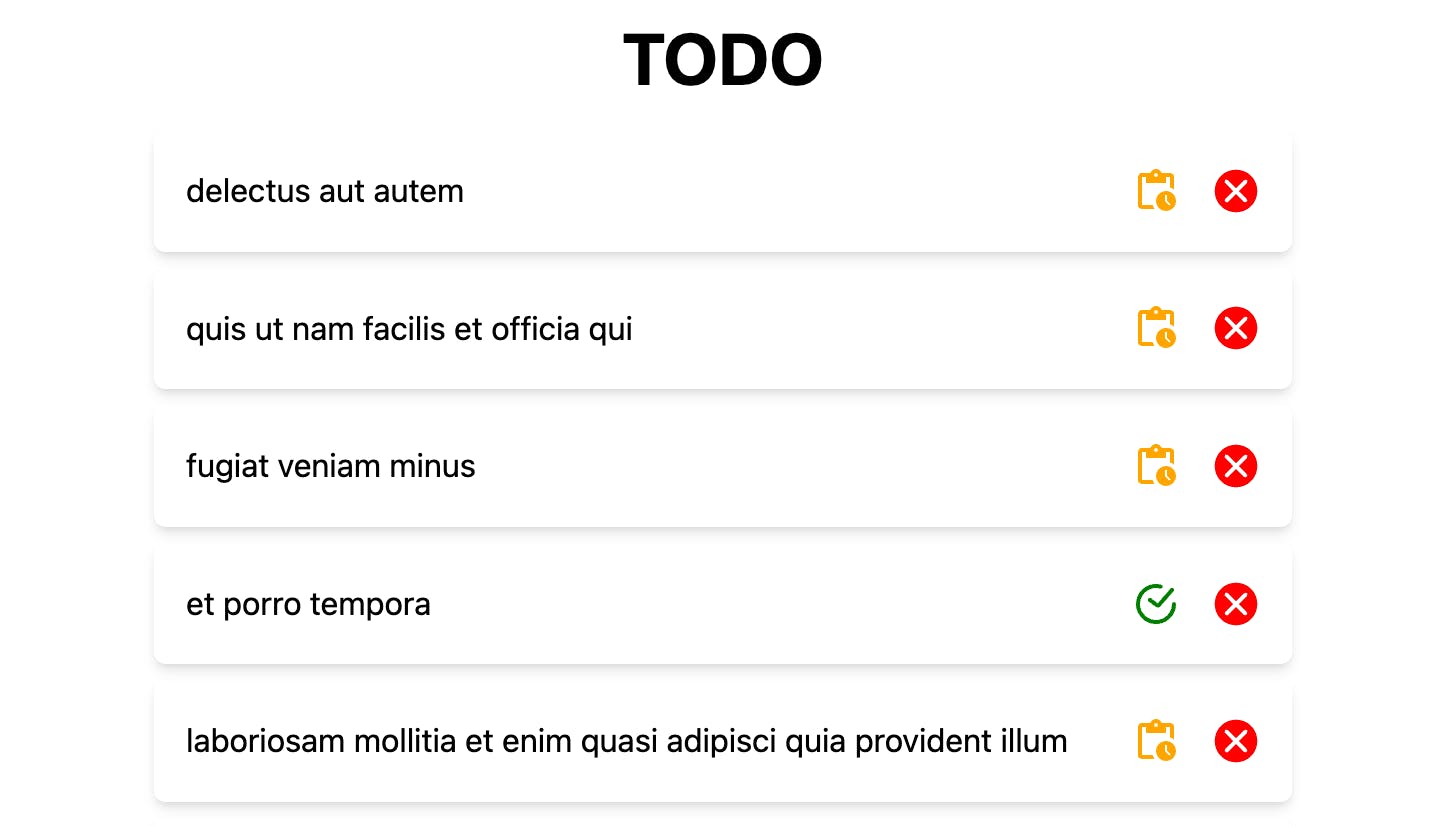
Since we now understand loader and it’s usage, let’s talk about the action. By the way, our application looks like this so far:
Action
According to the remix documentation:
A route
actionis a server only function to handle data mutations and other actions. If a non-GETrequest is made to your route (DELETE,PATCH,POST, orPUT) then the action is called before the loader.
Action complements the loader by providing an effective mechanism for handling user interaction and triggering server-side data mutations. In Remix, we generally make use of Form to trigger the action method.
export const addTodo = async (todo: todoType) => {
  try {
    const response = await axios.post(
      "<https://jsonplaceholder.typicode.com/todos>",
      todo
    );
    return response?.data;
  } catch (err) {
    console.log(err);
  }
};

export async function action({ request }: ActionFunctionArgs) {
  const formData = await request.formData();
  const { _action, ...values } = Object.fromEntries(formData);

  switch (_action) {
    case "add_todo":
      const todo = {
        id: Math.floor(Math.random() * 500),
        title: values?.todo_title as string,
        completed: false,
        userId: 1,
      };
      return await addTodo(todo);
  }
}
Now let’s understand the code. Here, I have defined an action method with request as a destructured parameter. The request object represents the incoming HTTP request made by the client to the server. It contains action name, and actual request body as well. Whenever we post something using Form, the action is triggered. How do we do that? Now let’s see the client side of this as well,
export default function Index() {
  const todoData = useLoaderData<typeof loader>();

  return (
    <div style={{ fontFamily: "system-ui, sans-serif", lineHeight: "1.8" }}>
      <h1 className="text-center my-4 font-bold text-4xl">TODO</h1>
      <div className="w-fit mx-auto">
        <Input />
        {todoData?.map((todo) => (
          <TodoList key={todo?.id} todo={todo} />
        ))}
      </div>
    </div>
  );
}

// and in /components/Input.tsx

import { Form } from "@remix-run/react";

const Input = () => {
  return (
    <Form method="post">
      <div className="flex my-8">
        <input
          className="shadow appearance-none border rounded w-full py-2 px-3 mr-4 text-grey-darker"
          name="todo_title"
          placeholder="Add Todo"
        />
        <button
          className="flex-no-shrink py-4 px-8 border-2 rounded text-teal border-teal hover:text-green-500 hover:bg-teal"
          type="submit"
          name="_action"
          value="add_todo"
        >
          Add
        </button>
      </div>
    </Form>
  );
};

export default Input;
I have refactored the index page to make it more readable. Here, the Input component has a Form component that the Remix itself provides. Did you notice that the button has two attributes called name and value? action field represents the action identifier submitted by the client. It specifies the type of action to be performed, such as adding a todo, updating a todo, deleting a todo, etc. When the form is submitted, it submits with form value and action values. So, the request object gets the type of action to be performed, i.e., _action and form values.
 switch (_action) {
    case "add_todo":
      const todo = {
        id: Math.floor(Math.random() * 500),
        title: values?.todo_title as string,
        completed: false,
        userId: 1,
      };
      return await addTodo(todo);
  }
This block is run whenever button with action value add_todo is submitted.
const { _action, ...values } = Object.fromEntries(formData)
values hold the request body, and we can access it as values?.todo_title here because we had input with the name todo_title in the Input component. After the request is complete, the loader is again called and thus fresh, mutated data is presented to the client.
Note: Forms without an action prop (<Form method="post">) will automatically post to the same route within which they are rendered, so using the ?index param to disambiguate between parent and index routes is only useful if you're posting to an index route from somewhere besides the index route itself. If you're posting from the index route to itself, or from the parent route to itself, you don't need to define a <Form action> at all, just omit it: <Form method="post">.
This is how action and loader work in Remix. Now, you can add the update and delete features similarly. It would be homework for you guys. But let me give you some outlines and hints:
// add this in each todo item for delete button
<Form method="post">
  <input type="hidden" value={todo?.id} name="todo_id" />
  <button type="submit" name="_action" value="delete_todo">
    X
  </button>
</Form>;

// and in action, add another case as:
switch (_action) {
    case "add_todo":
      const todo = {
        id: Math.floor(Math.random() * 500),
        title: values?.todo_title as string,
        completed: false,
        userId: 1,
      };
      return await addTodo(todo);

    case "delete_todo":
      const todoId = values?.todo_id;
      return await deleteTodo(todoId)
  }
In this way, you can pass the ID along with a hidden input and then perform the action for any kind of user interaction, including likes, updates, and many more. You do not have to stress over updating the state or mutating the data. Perform update using similar technique.
Bonus Tips:
If you think action and loader methods pollute the presentation component and want to separate them. They can’t be defined in other components except route pages itself but you can refactor them as shown below.
// Create a utils folder in the /app directory and
// create a file as action.server.ts
// and add following

import { ActionFunction, ActionFunctionArgs } from "@remix-run/node";
import { addTodo, deleteTodo } from "~/data/todoMethods";

export const TodoAction: ActionFunction = async ({
  request,
}: ActionFunctionArgs) => {
  const formData = await request.formData();
  const { _action, ...values } = Object.fromEntries(formData);

  switch (_action) {
    case "add_todo":
      const todo = {
        id: Math.floor(Math.random() * 500),
        title: values?.todo_title as string,
        completed: false,
        userId: 1,
      };
      return await addTodo(todo);

    case "delete_todo":
      const todoId = values?.todo_id;
      return await deleteTodo(todoId);
  }
};

// and then in the _index.tsx

export { TodoAction as action } from '@utils/action.server';
// do similar with loader
export { TodoLoader as loader } from '@utils/loader.server';

export default function Index() {
  const todoData = useLoaderData<typeof loader>();

  return ( .... )
  }
In this way, you can separate the action and loader from the UI logic. action.server.ts simply means the code only runs on the server. You can also place these files in the .server directory and normally name them action.ts.
Conclusion
Thus, Remix.js's Loaders and Actions offer an interesting and intuitive approach to data management and user interaction handling. By leveraging the power of Loaders to fetch data on server and Actions to manipulate or mutate the data in response to user interactions, we developers can build dynamic web applications without worrying much about revalidation and mutation.